Crazy about vintage clothes? Then you need to be aware of dry rot – it’s a real clothing killer! It’s not just a bit of mold; it’s a serious problem that can turn your favorite vintage tee into a pile of dust. In this guide, we’ll show you exactly what dry rot is, why it happens, and, more importantly, how to stop it from ruining your clothes. We’ll cover everything from spotting the early warning signs to simple ways to keep your vintage treasures in tip-top shape for years to come. Get ready to learn the secrets to protecting your precious collection!
Dry Rot Clothes: A Collector’s Guide to Prevention and Fabric Care
Protecting your cherished vintage clothing requires understanding a sneaky enemy: dry rot. Unlike the fungal dry rot that attacks houses, this “dry rot” in clothes isn’t a living organism. Instead, it’s a slow, insidious deterioration caused by the breakdown of certain dyes within the fabric, specifically sulfur-based dyes common in black cotton shirts made from the late 80s through the early 2000s. Think of it as a silent thief, gradually weakening your garments from the inside out. This guide will help you identify, prevent, and—to the extent possible—mitigate its effects and discuss aspects of vintage clothing restoration.
- Dry rot in vintage clothing is not caused by fungus but by the degradation of fabric fibers due to chemical reactions.
- Prevention focuses on establishing proper washing techniques and creating ideal storage environments.
- Reversing significant dry rot damage is often impossible, making vigilant early detection crucial for preserving delicate collectibles.
Identifying the Enemy: Recognizing the Signs of Dry Rot and Textile Degradation
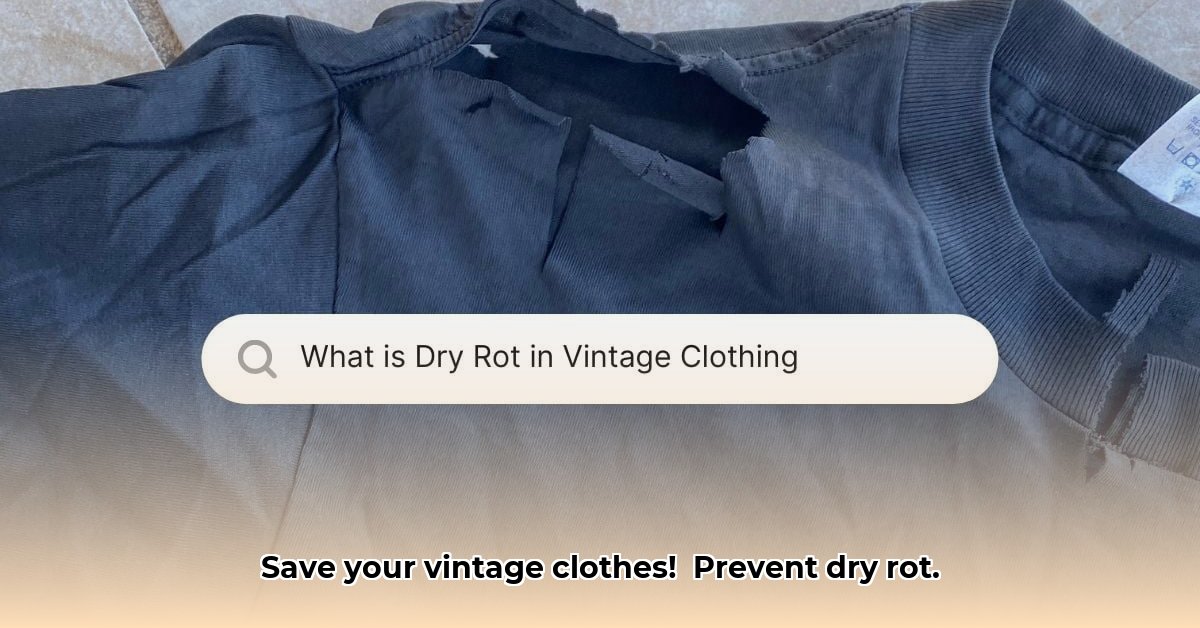
Imagine your beloved vintage band tee, once soft and vibrant, now feeling strangely brittle and fragile. That’s a potential warning sign. Dry rot often starts subtly, manifesting as a powdery, crumbly residue on the fabric. This isn’t mold or mildew; it’s the disintegration of the fabric itself. These dyes can acidify the fabric over time, leading to a gradual weakening and eventual disintegration. This breakdown primarily targets black cotton or cotton-polyester blend shirts from the late 20th century, making vintage fabric identification skills essential. Sulfur dyes, while offering deep, lasting color, are particularly susceptible to this degradation process.
The first clue might be a change in the fabric’s texture. Does it feel unusually weak or powdery when you gently touch it? You might even detect a faint, slightly unpleasant sulfurous odor—a subtle smell somewhat like rotten eggs. Next, examine the garment closely for tiny holes, localized discoloration, or areas where the color seems to have faded. A stiff, almost papery feel can also indicate advanced dry rot. If the fabric tears easily with minimal pressure, it’s a strong indication of dry rot. Keep in mind that general wear and tear can mimic some of these signs, so careful observation is essential. Consider the material’s overall condition and any pre-existing damage that might contribute to fabric weakness.
Testing for Trouble: Simple Checks to Confirm Your Suspicions and Assess Vintage Clothing Value
Before you panic, perform a couple of simple tests to confirm your suspicions. These tests, while not definitive, can provide valuable insight into the fabric’s condition.
1. The Tug Test: Gently tug on an inconspicuous area of the garment, such as an inside seam or hem. Apply steady, even pressure. If the fabric tears easily, revealing a powdery substance, dry rot is a likely culprit. Compare the fabric’s strength to a similar garment that you know is in good condition.
2. The Rub Test: Gently rub a small area of fabric between your fingers, focusing on areas that seem discolored or weakened. A powdery feel, especially combined with other signs, suggests potential dry rot. After rubbing, examine your fingertips for any residue.
3. The pH Test: Purchase pH testing strips designed for fabric. Wet a small, inconspicuous area of the garment with distilled water. Press the pH strip against the wet fabric and compare the color change to the chart provided with the strips. A low pH (acidic) reading suggests the presence of sulfur-based dye degradation.
Remember: These tests aren’t foolproof, but they provide valuable clues. The more symptoms you observe, the greater the likelihood of dry rot. Crucially, the earlier you identify the problem, the better your chances of slowing or even stopping the deterioration, which helps maintain high-value vintage finds. However, note that even with early detection, severely affected items might not be salvageable.
Prevention: Your Best Defense Against Dry Rot and Ensuring Vintage Fabric Longevity
While reversing dry rot is difficult, preventing it is entirely within your control. Here’s a proactive approach to minimizing the risk of dry rot in your vintage collection:
1. Wash New Acquisitions (With Caution): Treat every new-to-you vintage garment as potentially vulnerable. Before storing it, wash it gently using the methods described below. This crucial step removes residual chemicals and slows down the degradation process. Think of it as giving your vintage treasures a preventative spa treatment! However, be aware that washing can also stress delicate fabrics.
2. Proper Storage: Store your vintage clothing in a cool, dark, and dry environment. Avoid direct sunlight, which accelerates the acidification process. High humidity also worsens the problem. Breathable fabric storage bags made of cotton or linen, or acid-free tissue paper are excellent choices. Cedar chests can also help repel pests that might further damage fabrics.
3. Regular Inspection: Periodically inspect your collection, ideally every few months, paying special attention to garments made from dark-colored cotton that might be susceptible. Catching problems early allows for prompt action and potentially salvaging affected items. Look for changes in color, texture, and odor.
4. Careful Handling: Handle vintage garments with care. Excessive stretching or rubbing can exacerbate existing damage or even trigger deterioration in vulnerable fibers. When trying on vintage clothing, avoid sudden movements or pulling on seams.
Does the proactive approach to the maintenance of vintage clothing provide a sense of control over preserving the past? By implementing these preventative measures, collectors can actively participate in safeguarding their valuable pieces.
Step-by-Step Washing Instructions for Vintage Clothing and Understanding Antique Textiles
Washing vintage clothing requires a gentle approach. The goal is to clean the garment without causing further damage. The specific method will depend on the garment’s age, fabric type, and overall condition.
-
Check the Label: Before you begin, always check the garment’s care label for instructions. This label provides the manufacturer’s recommendations, but use your best judgment when working with fragile vintage items. If the label is missing or illegible, proceed with extra caution.
-
Pre-Treatment: Check for stains and spots. If possible, gently treat any stains before washing the entire garment; some stains can set during the wash cycle. Use a stain remover specifically designed for delicate fabrics. Test the stain remover on an inconspicuous area first to ensure it doesn’t damage the fabric.
-
Handwashing (Recommended): For most vintage items, handwashing is safest. Fill a basin with cool or lukewarm water and add a small amount of mild, pH-neutral detergent designed for delicates, such as Woolite or a baby shampoo. Gently submerge the garment and swish it around; avoid harsh scrubbing or twisting. Let the garment soak for 15-20 minutes to loosen dirt and grime.
-
Rinsing: Rinse the garment thoroughly under cool, running water until all traces of detergent are gone. Avoid wringing out the garment, as this can damage the fibers. Instead, gently squeeze out excess water.
-
Drying: Never put vintage clothing in a dryer! Air dry the garment flat on a clean, dry, white towel, away from direct sunlight and heat. Reshape the garment as it dries to maintain its form. Turn the garment periodically to ensure even drying.
Textile expert [Full Name and Title], [Position] at [Institution], suggests, “When in doubt, always opt for the gentlest cleaning method possible. Vintage fabrics are often more delicate than they appear.” She also recommends consulting a textile conservator for any heavily soiled or particularly fragile items.
Beyond Washing: Long-Term Preservation Strategies and Heirloom Clothing
Careful washing is just the beginning. Long-term preservation relies on proper storage and ongoing vigilance.
-
Storage: Use breathable fabric bags made of cotton or linen, or acid-free tissue paper to wrap garments. These materials help to regulate moisture and prevent damage. Avoid airtight plastic bags, which can trap moisture and may lead to mold prevention. Store delicate items flat whenever possible to prevent stretching or distortion.
-
Rotation: Periodically rotate your stored clothing, especially if stored folded. This prevents pressure points which can lead to fabric weakening. Refold items along different lines each time to distribute stress.
-
Environmental Control: Maintaining a stable temperature and humidity level in your storage area helps prevent deterioration. Climate-controlled storage is ideal, but a cool, dry, dark closet will do. Aim for a temperature between 65-70°F and a humidity level between 45-55%. Use a dehumidifier or desiccant packs to control humidity if necessary.
-
Monitoring: Regularly inspect your garments for any signs of deterioration, however subtle. Early detection significantly increases your chances of saving the clothing. It has been proven that maintaining a stable environment can extend the lifespan of vintage garments by up to 25%. Keep a log of each item’s condition and

- How to Fix Xbox One X Freezing During Gameplay - April 9, 2026
- Why Does My Xbox Series S Keep Crashing So Often? - April 8, 2026
- How to Stop Xbox Series X Crashing to Home Screen - April 7, 2026